


Table of contents
- Introduction
- Step 1: Install the project.
- Step 2. Add configuration for Playwright Project.
- Step 3. Getting familiar with Playwright Projects.
- Step 4. Outline a specific test scenario.
- Step 5. Consider Test Data.
- Step 6. Create Test Data
- Step 7. Extend TestOptions.
- Step 8. Use TestOptions in Test Case.
- Step 9. Update Project section.
- Step 10. Execute all projects and Explore Report.
- Step 11. Execute Specific Project.
- Conclusion.
Introduction
Today, I encountered an interesting challenge while working on a Playwright project at work, and I’d like to document my findings.
The task was to simultaneously run multiple projects, each with different sets of data.
Thankfully, Playwright offers a feature to address this requirement — the ability to declare options.
In this article, I’ll walk you through the process of leveraging Playwright’s option declaration feature to efficiently manage and execute multiple projects concurrently.
Explore the demo-project’s code snippets on my GitHub repository:github.com/nora-weisser/playwright_demo
Step 1: Install the project.
npm init playwright@latest
Playwright will download all needed browsers and create the following structure of the project:
playwright.config.ts
package.json
package-lock.json
tests/
  example.spec.ts
test-examples/
  test.examples.ts
Step 2. Add configuration for Playwright Project.
Navigate to playwright.config.ts. This file serves as the central hub for Playwright configurations, allowing you to set up settings such as preferred browsers for your Playwright tests. Within the configuration, locate the 'use' section and set the base URL. In this demonstration, I've chosen 'https://www.saucedemo.com/' as the base URL for demo purposes.
use: {
    /* Base URL to use in actions like `await page.goto('/')`. */
    baseURL: 'https://www.saucedemo.com/',
    /* Collect trace when retrying the failed test. See https://playwright.dev/docs/trace-viewer */
    trace: 'on-first-retry',
 },
Step 3. Getting familiar with Playwright Projects.
Scrolling down within the file, you’ll encounter various projects. I’ve included a definition from the Playwright documentation below for your reference:
A Project is logical group of tests running with the same configuration. We use projects so we can run tests on different browsers and devices. Projects are configured in the playwright.config.ts file and once configured you can then run your tests on all projects or only on a specific project. You can also use projects to run the same tests in different configurations. For example, you can run the same tests in a logged-in and logged-out state.
Step 4. Outline a specific test scenario.
Test case: implement a login test case and execute it with various sets of data
The parameterization feature plays a crucial role here, enabling the configuration of each project to run the test case against different username/password pairs.
Step 5. Consider Test Data.
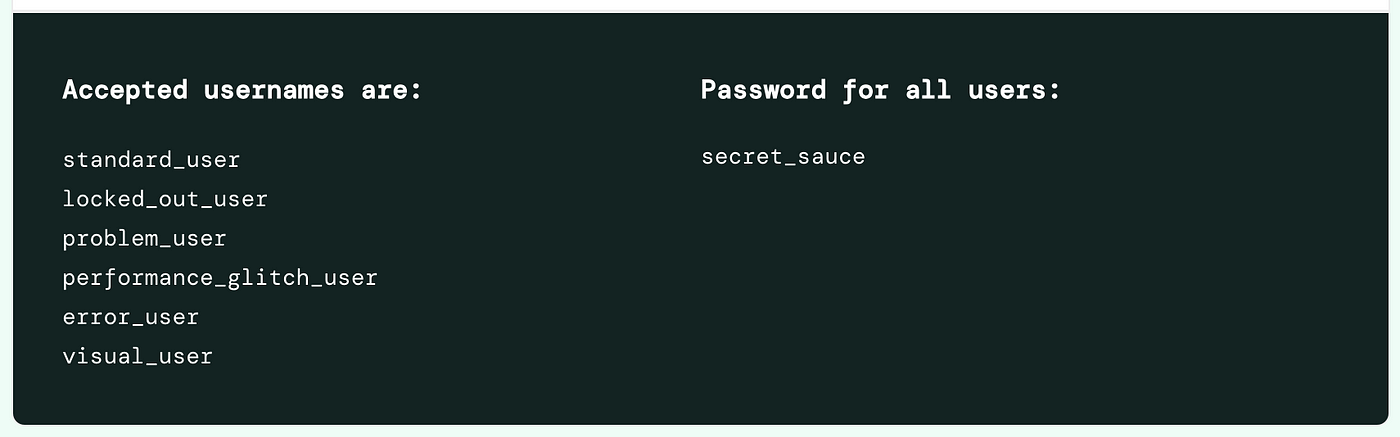
Test Data is listed on login screen for testing purposes.
Step 6. Create Test Data
Establish a ‘test_data’ folder, and within it, create ‘login.data.ts.’ Begin by declaring an interface that encapsulates the necessary properties (username and password) along with their data types.
export interface USER_DATA {
    username: string,
    password: string
}
Introduce a variable USERS and list all test users designed for the testing purposes.
export const USERS: {[type: string]: USER_DATA} = {
    "standard_user": {
        username: "standard_user",
        password: "secret_sauce"
    },
    "locked_out_user": {
        username: "locked_out_user",
        password: "secret_sauce"
    },
    "problem_user": {
        username: "problem_user",
        password: "secret_sauce"
    },
    "performance_glitch_user": {
        username: "performance_glitch_user",
        password: "secret_sauce"
    },
    "error_user": {
        username: "error_user",
        password: "secret_sauce"
    },
    "visual_user": {
        username: "visual_user",
        password: "secret_sauce"
    }
}
Step 7. Extend TestOptions.
In order to incorporate the ‘user’ parameter into both the test case and project, it’s essential to declare the option ‘targetUser’ and set its value in the configuration. Create a ‘helper’ folder and within it, establish ‘test-option.ts.’
Extend the existing ‘TestOptions’ by introducing a new option, ‘targetUser,’ to facilitate the integration of user parameters.”
import { test as base } from '@playwright/test'
import { USER_DATA } from '../test_data/login.data'
import { USERS } from '../test_data/login.data'

export interface TestOptions {
    targetUser: USER_DATA
}
export const test = base.extend<TestOptions>({
    targetUser: [USERS['standard_user'], { option: true }],
})
Step 8. Use TestOptions in Test Case.
import { expect } from '@playwright/test';
import {test} from '../helpers/test-options'

test('login with existing username and valid password', async ({ page, targetUser }) => {
  await page.goto('/');
  //await page.goto('https://www.saucedemo.com/');
  await page.locator('[data-test="username"]').click();
  await page.locator('[data-test="username"]').fill(targetUser["username"]);
  await page.locator('[data-test="password"]').click();
  await page.locator('[data-test="password"]').fill(targetUser["password"]);
  await page.locator('[data-test="login-button"]').click();
  const currentURL = page.url();
  expect(currentURL).toBe('https://www.saucedemo.com/inventory.html')
  await expect(page.locator('#header_container')).toContainText('Swag Labs');
});
Important Note: Import the ‘test’ function from the helper we created using the following path ‘../helpers/test-options’.
Step 9. Update Project section.
import { defineConfig, devices } from '@playwright/test';
import type { TestOptions } from './helpers/test-options';
import { USERS } from './test_data/login.data';

export default defineConfig<TestOptions>({
projects: [
    {
      name: 'standard_user',
      use: { ...devices['Desktop Chrome'], targetUser: USERS['standard_user'] },
    },
    {
      name: 'locked_out_user',
      use: { ...devices['Desktop Chrome'], targetUser: USERS['locked_out_user'] },
    },
    {
      name: 'problem_user',
      use: { ...devices['Desktop Chrome'], targetUser: USERS['problem_user'] },
    },
    {
      name: 'performance_glitch_user',
      use: { ...devices['Desktop Chrome'], targetUser: USERS['performance_glitch_user'] },
    },
    {
      name: 'error_user',
      use: { ...devices['Desktop Chrome'], targetUser: USERS['error_user'] },
    },
    {
      name: 'visual_user',
      use: { ...devices['Desktop Chrome'], targetUser: USERS['visual_user'] },
    },
}
Step 10. Execute all projects and Explore Report.
Run command: npx playwright test
By default, Playwright generates test reports that include information about test execution, success or failure of individual tests, and any errors encountered during the test run. The purpose of the reporter is to provide visibility into the test results, making it easier for developers or testers to understand the outcome of their automated tests.
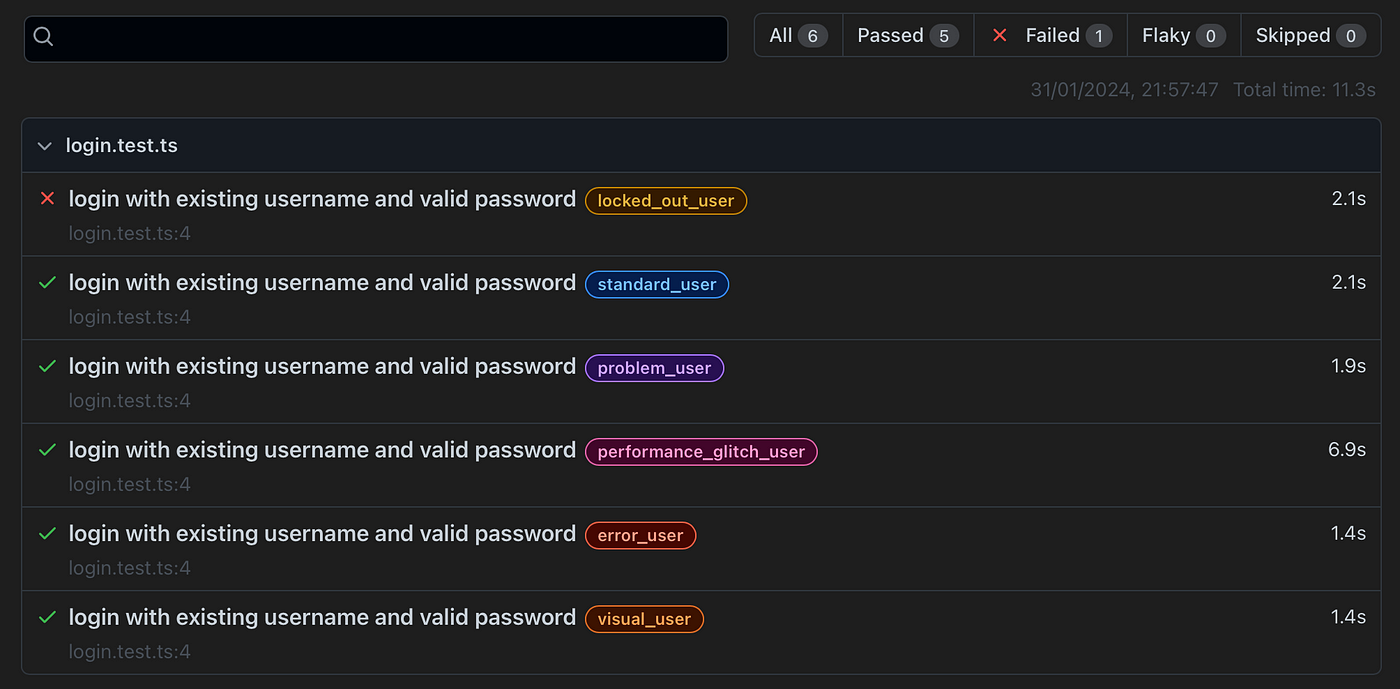
Playwright Report View
In this specific instance, the test cases executed are listed along with the information on the users that have been processed. A deliberate inclusion of a failed test case, ‘locked-out-user,’ is made to showcase a scenario where login into the application fails.
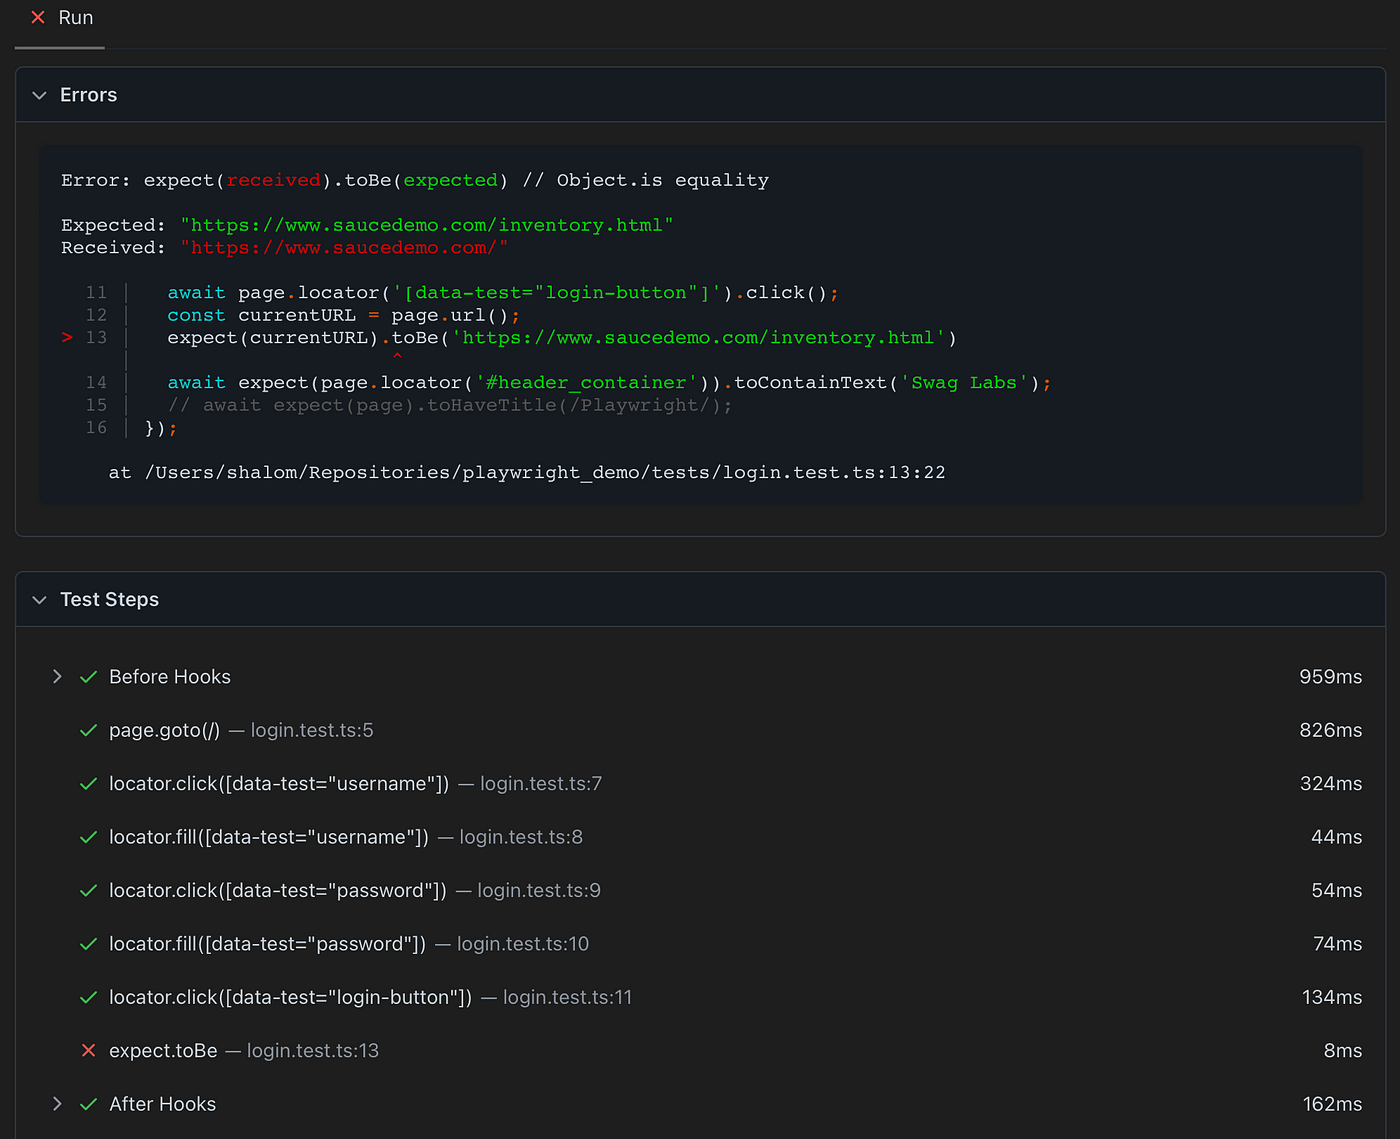
Additional information listed for failed test case
Step 11. Execute Specific Project.
Utilize the following command: npx playwright test -project=<project name>. This command executes the login test case against a predefined dataset for the specified project.
Conclusion.
In this piece, I shared my findings regarding parameterization in Playwright projects, covering aspects ranging from establishing test data to updating configurations and implementing options. Through the utilization of this feature, there is potential to improve maintainability, broaden test coverage, and improve the efficiency of issues identification.
Resources:
Test Parameterize: https://playwright.dev/docs/test-parameterize
Repo with demo-project: https://github.com/nora-weisser/playwright_demo